Product design
- Home
- / Services /
- Product design
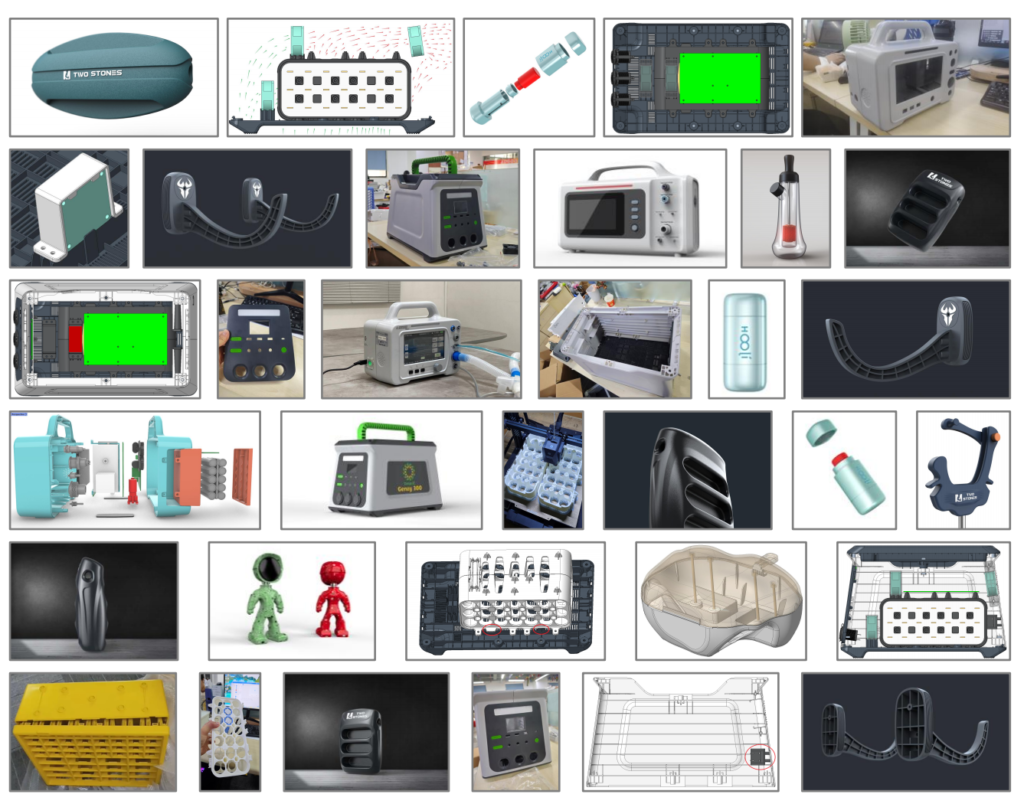
OEM outdoor 3D product design service
A Comprehensive Guide to the Product Design Process: From Sketch to Validation
Product design is a meticulous and iterative journey that transforms a fleeting idea into a tangible, functional, and market-ready object. It is a symphony of creativity, engineering, and user-centric thinking, orchestrated through a structured sequence of phases. While methodologies may vary, a robust design process typically unfolds through four critical, interconnected stages: Product Sketching, Detailed Design, Structural Design, and Design Verification & Refinement. This 1000-word guide delves into each step, illustrating how raw concepts are honed into successful products.
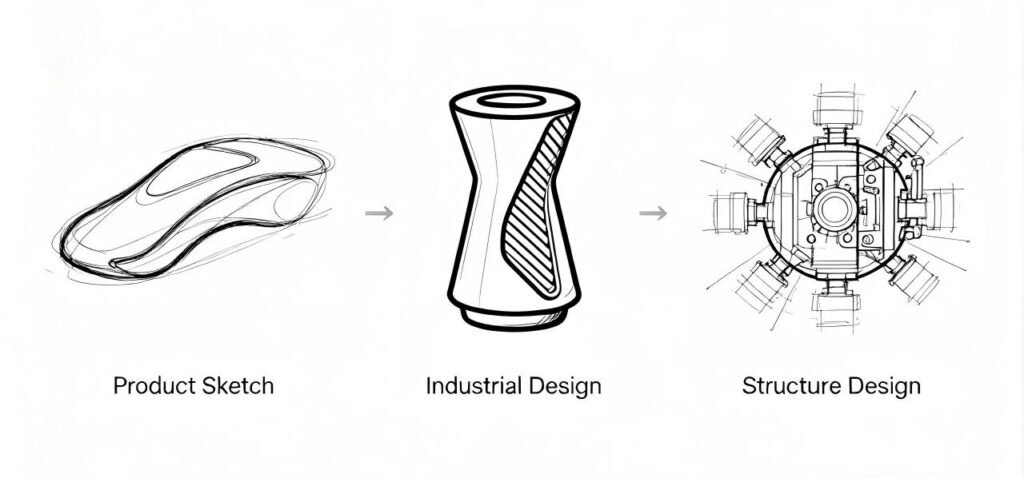
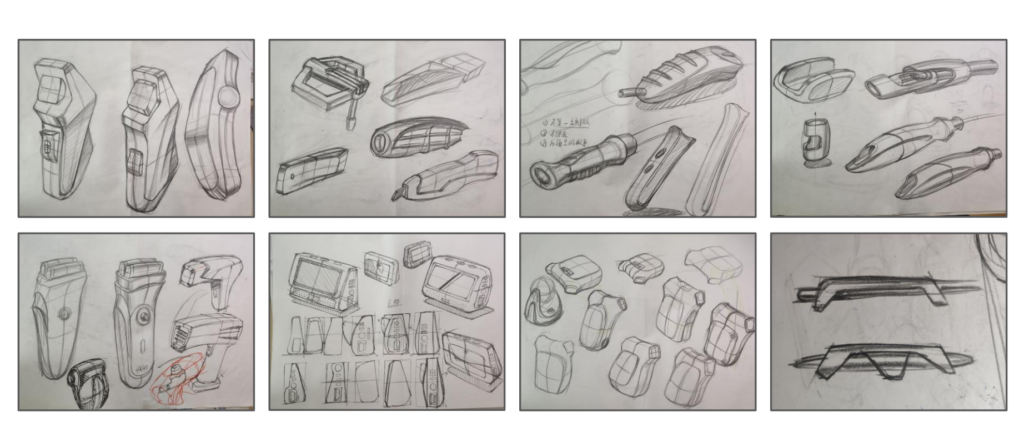
Stage 1: Product Sketching – The Genesis of Form and Function
This initial stage is the birthplace of the product, where imagination is given its first visual form. It is about exploration, ideation, and rapid communication without the constraints of precision engineering.
Purpose & Activities: The primary goal is to generate a vast array of concepts quickly. Designers use tools like pen and paper, markers, or digital tablets to create freehand sketches, thumbnail drawings, and exploratory renderings. This phase focuses on:
Concept Ideation: Brainstorming multiple solutions to the identified user need or problem.
Form Exploration: Experimenting with different shapes, proportions, and aesthetic languages.
Basic Ergonomics: Considering how the user might initially interact with the product, its rough scale, and stance.
Storytelling: Using sketches to convey the product’s context of use, its core functionality, and its emotional appeal.
Key Outcomes: The result is not a single perfect drawing but a portfolio of visual ideas. Mood boards, concept boards, and a shortlist of the most promising sketches guide the next phase. The best sketches successfully communicate the product’s intended experience and core value proposition, serving as a crucial reference point for all subsequent work. This stage values quantity and creativity over detail, ensuring no good idea is left unexplored.
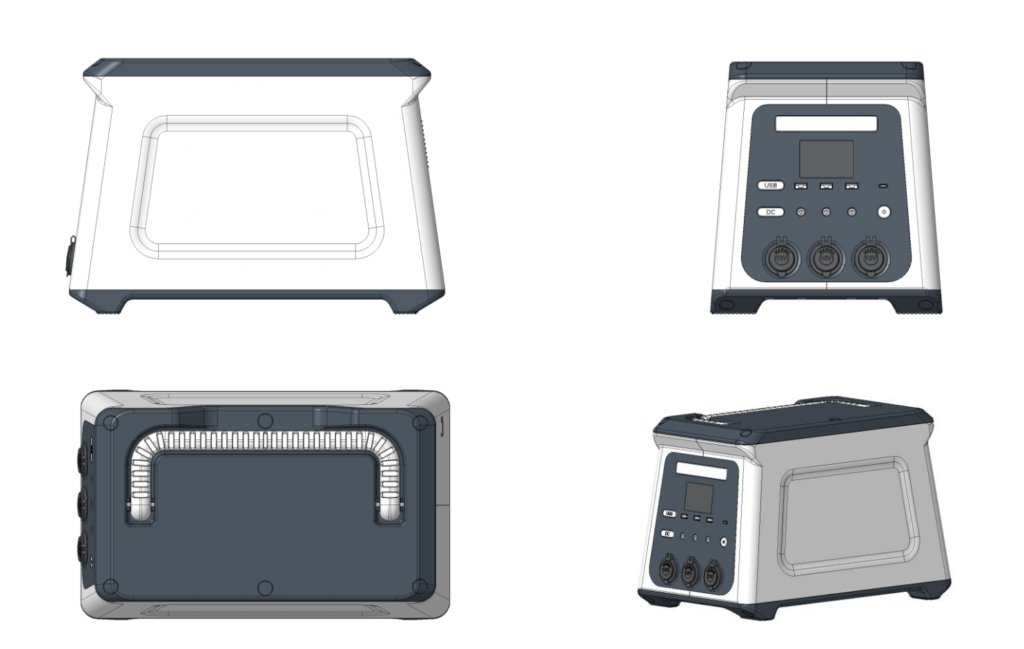
Stage 2: Detailed Design – Defining the Experience
With a selected direction from the sketching phase, the design now enters a phase of definition and specification. This is where the product’s character, usability, and final appearance are meticulously crafted.
Purpose & Activities: This stage transitions from “what could it be?” to “exactly what will it be?”. Designers employ advanced 2D and 3D Computer-Aided Design (CAD) software to create detailed digital models. Key activities include:
High-Fidelity 3D Modeling: Building accurate digital surfaces that define the product’s final form, curves, and transitions.
Ergonomics & Usability Refinement: Integrating precise anthropometric data to ensure comfortable grip, intuitive control placement, and accessible interfaces. Digital human models may be used for simulation.
Material & Finish Specification: Defining surface textures, colors, finishes (matte, gloss, textured), and brand-consistent graphic treatments.
Photorealistic Rendering: Creating lifelike images and animations to visualize the product in realistic environments for internal reviews, marketing previews, and stakeholder presentations.
Key Outcomes: The deliverable is a complete set of digital models and renderings that represent the product’s final intended design. This “design intent” model is visually resolved and serves as the aesthetic blueprint. It answers detailed questions about user interaction, aesthetics, and perceived quality but is not yet engineered for manufacture.
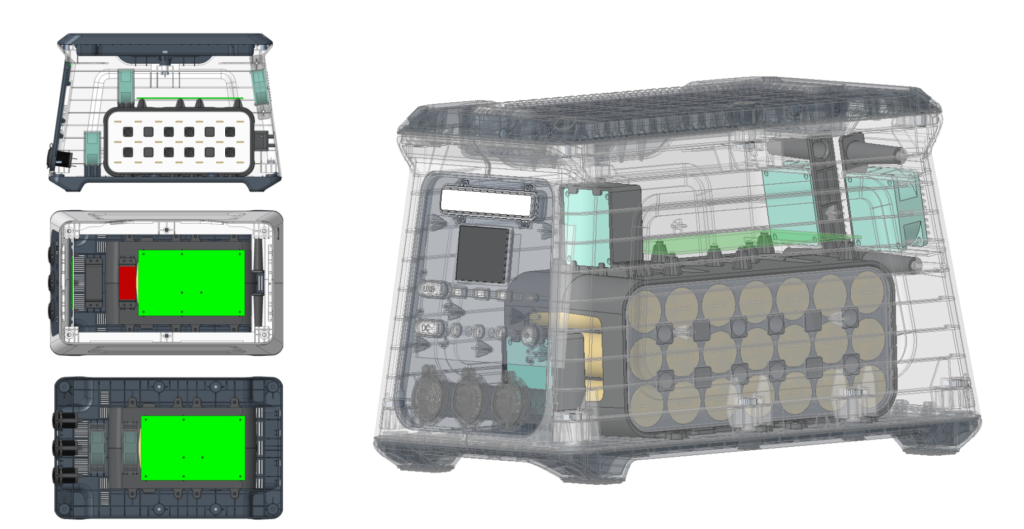
Stage 3: Structural Design – Engineering for Reality
The structural design phase is where the beautiful exterior is integrated with the hard truths of physics, material science, and manufacturability. It bridges industrial design with mechanical engineering.
Purpose & Activities: The goal is to transform the design intent model into a functional, durable, and producible assembly. Engineers and designers collaborate closely on:
Internal Architecture: Designing the internal chassis, partitions, and mounting points for all components (PCBs, batteries, motors, etc.).
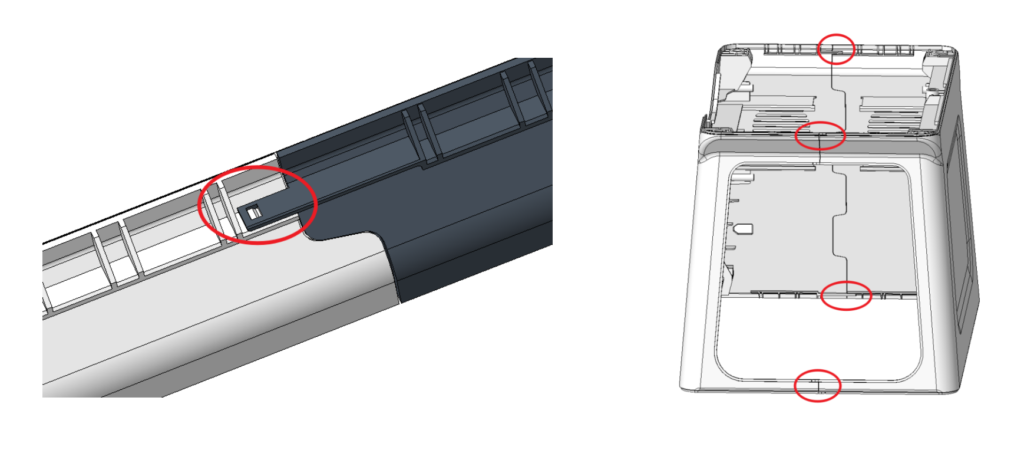
Part Breakdown: Strategically dividing the product into individual, manufacturable parts (housing halves, buttons, lenses, etc.) while considering assembly sequence (Design for Assembly – DFA).
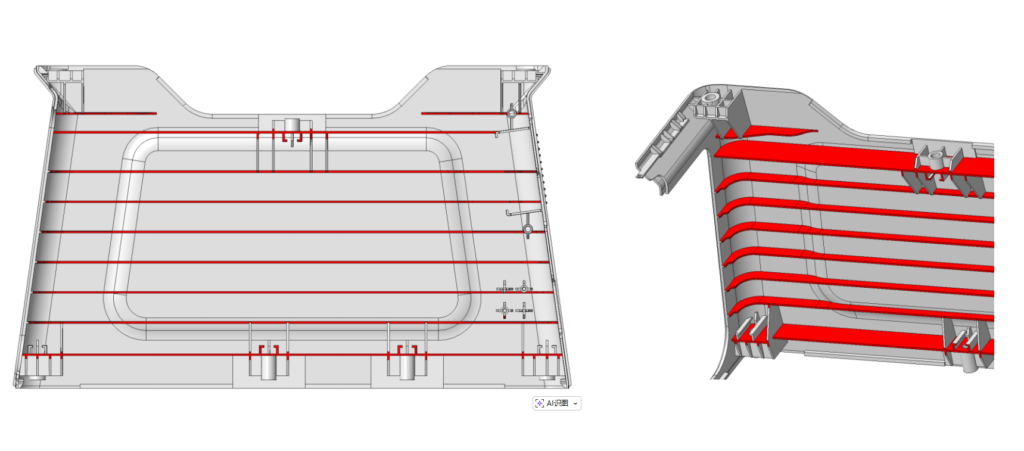
Material Selection for Function: Choosing specific engineering plastics, metals, or composites based on strength, stiffness, heat resistance, cost, and manufacturing method (injection molding, die-casting, etc.).
Design for Manufacturability (DFM): Optimizing every part for its chosen production process. This includes adding necessary draft angles for mold release, ensuring uniform wall thickness, specifying appropriate radii, and designing robust snap-fits, screw bosses, and ultrasonic welding features.
Key Outcomes: The primary deliverable is a fully detailed, “engineering-grade” 3D CAD assembly. This model includes every part, screw, and seal, with precise dimensions, tolerances, and manufacturing features. It is accompanied by preliminary technical drawings and a Bill of Materials (BOM). This is the definitive virtual prototype of the product as it will be built.
Stage 4: Design Verification and Refinement – The Crucible of Testing
Before committing to expensive production tooling, the design must be rigorously validated. This phase is a feedback loop of prototyping, testing, and refinement to de-risk the project.
Purpose & Activities: This stage subjects the design to real-world conditions to uncover flaws, validate performance, and ensure quality. It is an iterative cycle of:
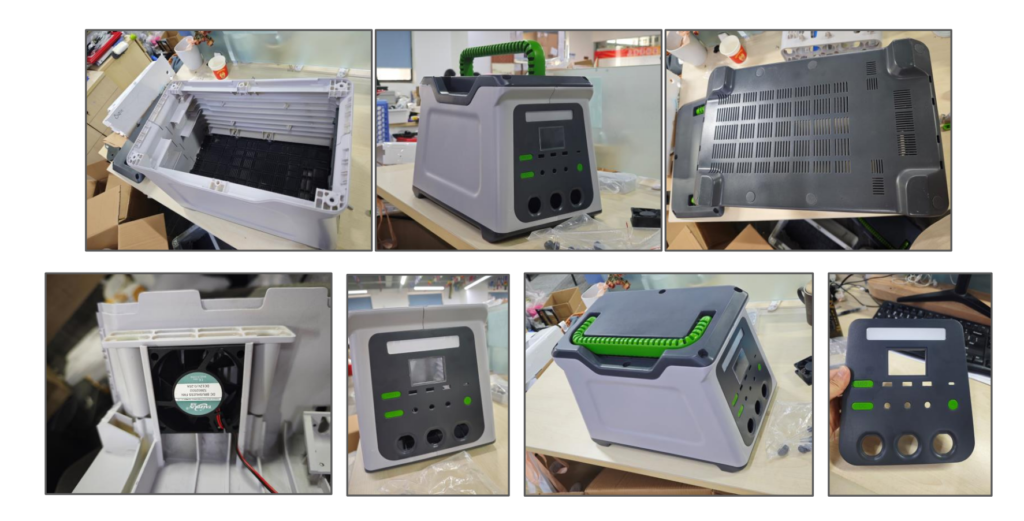
Prototyping: Creating physical models using various methods. Early prototypes might be 3D-printed for form and fit checks. Later, high-fidelity prototypes using materials closer to production (e.g., CNC-machined or silicone-molded parts) are used for functional testing.
Functional Testing: Verifying that the product works as intended—testing buttons, hinges, battery life, water resistance (IP ratings), drop resistance, and electronics integration.
User Testing: Placing the prototype in the hands of target users to gather feedback on usability, ergonomics, and overall appeal, observing issues not evident in the virtual model.
Compliance & Certification Testing: Ensuring the product meets all required safety, regulatory, and environmental standards (e.g., FCC, CE, UL).
Conclusion
The journey from a simple sketch to a validated design is a testament to the collaborative and disciplined nature of product design. Each stage builds upon the last: Sketching captures the soul of the idea, Detailed Design gives it a defined face and feel, Structural Design builds its bones and muscles for the real world, and Verification & Refinement stress-tests it to ensure resilience and success. This four-step framework is not a rigid linear path but a fluid, iterative dialogue between creativity and pragmatism. By diligently following this process, designers and engineers can mitigate risks, control costs, and ultimately deliver innovative products that are not only beautiful and desirable but also reliable, manufacturable, and truly resonate with users.